


It's our first {SIG} tutorial! I've got to give Andrea the credit. This is her project, I just thought it would be great for our intro in to the tutorial world. We brainstormed quite a bit & are going to be keeping a list of little projects we think are fairly easy to do. If you ever have any questions, please email us at signature.creations@hotmail.com. Here goes...the {SIG} Bowtie Hair Clip...
Materials:
Scrap piece of fabric for the main part of the bow
(you choose the size but for this tutorial, we are going w/ a piece that is 6” x 2.5”)
Scrap piece of fabric for the center band of the bow
(at least 1.5” x 2” & it can be the same or different fabric)
Thread/string/curling ribbon
~Glue gun (I like a high heat glue gun)
Hair clip of your choice, we are using a single prong clip
Iron
Construction:
Cut your scappy in to a 6” x 2.5” piece. Cut your center band in to a 1.5” x 2” piece.
Now you are going to fold your bow tie piece in to thirds. Press to hold shape.
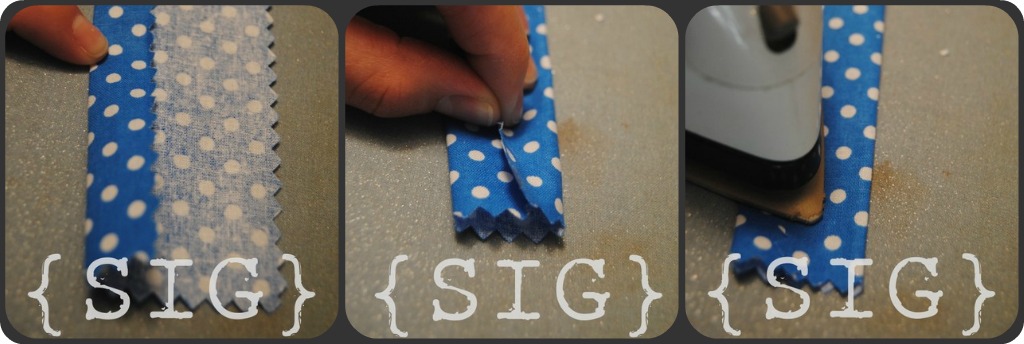 The next step is to fold your piece toward the middle. Make sure the ends overlap. This is a must otherwise your bow tie will come apart! Press to hold shape.
Now it is time to make the bow tie “look” like a bow tie! You will need to grab your thread/string/curling ribbon for this step. Cut about 6-8”. Curling ribbon tends to stretch a bit & will hold a tie as you are knotting it & most everyone has some laying around. If you are a sewer, you can also use thread. We like to use Stretch Magic (normally used to make jewelry).
Fold your nicely pressed piece in to halves. You will then fold the top half back & the bottom half back. This is going to make it look like a pair of fabric lips. Tie that pucker together!


Time to put the center panel together! Take the smaller piece of fabric (you can use the same fabric or a contrasting fabric piece) & cut it to a 1.5” x 2” piece. Now repeat Step 2 by folding this piece in to thirds, long way.

Time to glue the center band in place along with the clip. You can choose to line your clip with 3/8” grosgrain ribbon but for this tutorial, we were thinking more along the lines of what you may have at home & to save a few bucks. Not only that, you can't see the clip anyway.
Take the clip & put some hot glue along the length of the flat side of the clip. Center your bow tie on the clip. Hold in place until it dries.
Now, take that center band & hot glue it to the inside of the clip directly below the tied part of your bow. Wrap the band tightly around. If you want to secure the center on the top of the bow, put a tiny dot of glue, then continue around until it gets back to where you started. Put some more hot glue down & smoosh that fabric down tight until it dries.

You are all done! Shout “hip-hip-hooray” & jump up & down! Now, comes the tough part. Where do you place it in your hair? There are so many possibilities! The best part, if you want to make the bow tie bigger, you can. Just start with bigger pieces. Enjoy!!!

XOXO,
Astrid & Andrea
PS ~ Click on the photos for a larger image!
19 comments:
So cute! Thanks for sharing
mategan@msn.con
yay!thanks always wanted to try these!
urfavgirl07@aol.com
Great job guys!
wahooooo!!!! Love it!!!
<3
Jana
j.marie.designs@alaska.net
1) Sure glad I trimmed up my nails yesterday...made for nicer hand pics.
2) Wish I had made up my hair/face a little better. Guess one always has to be prepared for anything when it comes to activities with Astrid!
3) This tutorial came out awesome!! You are definitely getting the hang of this. I LOVE it!! =)
This is so cute! What a great way to use up scrap.
supermom@nocapesrequired.com
Very Cute!! jsheaffer2000@yahoo.com
So cute and practical for our little girls. Thanks to the SIG team for all of your creative ideas that help us moms.
Thank you for a great tutorial! I always wanted to try making them! plcoleman04@verizon.net
I can't wait to try this. Thanks for sharing. I don't know how you guys have time for this on top of orders and little ones....
atarlton@yahoo.com
Thanks so much! I've been wanting to make bows for my daughter!
malina.jacobs@gmail.com
cute! can't wait to try it out!
lildoll_12@hotmail.com
This is so cute! Can't wait to try it. ruby.hernandez01@yahoo.com
Cute!
pinkstarsbowtique@gmail.com
That's really cute! Thanks for sharing!
lindaknoll@att.net
Awesome. Thanks so much! <3
Very clear step-by-step instructions for making the bows. Well done! :)
This is really very nice post you shared, i like the post, thanks for sharing..
হেয়ার স্টাইল
Post a Comment