Monday, September 30, 2013

Back from the LIVING DEAD

Pin It
I had to have surgery.
I felt like a zombie for about 8 days.
For real...pain meds & I do not like each other much.


But I am now on the mend.
Off all the meds & healing.
And this is only the 1st of a couple I have to endure.

Age is definitely a factor.
Recovery time has been much longer.
Shoot, finding my brain alone took a good 10 days!

Even then, I am still struggling to remember things.
Do.not.like.surgery.
Unfortunately ya gotta do what ya gotta do.

And now I will be keeping up with the blog again!
Stay tuned for the rest of the photography series & other great topics!
Hope to see you around & have a wonderful day.

{SIG}nature Creations

Sunday, September 8, 2013

How to Photograph Your Garment: Neutral Background

Pin It
What is the world are you talking about?
A neutral background?
Well, it isn't all that difficult a concept, I promise!

When you photograph a garment or accessory, the last thing you want to do is detract from it.
Your background has EVERYTHING to do with this.
And it can ruin a picture.

Let's take a look at this first one.
Great scarf, huh?


Unfortunately, scarves are a bit difficult to photograph.
So, I thought it would be brilliant to hang it on a line.
BUT, your eye doesn't go directly to it.

There is all that green stuff to the left that competes with the scarf.
This makes the background not so neutral.
It is also a great example of "noise".
{read more about noise HERE}

{photo is from Etsy Shop BirgitBlau}

Now, this is a much better picture of a scarf.
Honestly, I'm not one for cutting off heads BUT it is still a fantastic photo.
The background is neutral and the focus is the scarf.

Let's look at some more photos submitted from the ladies in my pattern group.


Christina sent this one one.
Let's just get to it, the background is too busy.
The decals, although super cute, take away from the dress & that cutie wearing it.

The ground has 2 colors, the white rug takes your eyes directly there.
Not the best of shots, if you are trying to focus on that baby girl & what she is wearing.
I even cropped it, and you can still see the purple curtain.


This is another photo submitted by Christina.
She is on the right track here.
The background is more neutral.


What makes this neutral?
One, the color.
Two, there are no decals or frames or any other things to distract the eye.


But there is one thing.
The one issue I have here are the lines.
This shot would have been better if she had taken it straight on.

Here are a few examples of what neutral means.
Neutral and when you don't have a model to put your garment on.


All white.
And although this is a neutral background, it isn't a great shot.
It is the door to my kitchen pantry.

Shiny paint.
Makes light jump off of it.
And yes, funny shadows.

Here is an even better neutral background.


Wooden fences are perfect.
Personally, I am a minimalist.
Although I do like what professional photogs do w/ props,
I also believe they take away from the garment.

In the case of the dress above, the wooden fence let's the dress shine.
You see all the detailing.
And notice that the mannequin is hanging off the HORIZONTAL part of the fence.

Lines are important.
This means, make them vertical & horizontal.
This pleases the eye.


This one is great.
The chalkboard & the wooden deck make the perfect neutral background.
The chalkboard actually provides a neat frame & no, the item doesn't have to fit perfectly in to it.


Here is the chalkboard again but on grass.
The grass is a great neutral, doesn't take away from the skirt.
I have even laid the skirt on the grass alone & honestly,
that is better than laying it on your wooden floors inside.


Now, let's look at some garments on models.
Again, I take all my photos, occasionally I have some pro pics sent it.
But to be blatantly honest, it is expensive to swap, trade, barter, or what ever...you get the picture.
Why not learn how to take pics on your own?


Haven't you noticed that backgrounds are normally a copy of great things around you?
Bricks, wooden fence (whether it is neutral or painted white), cement, etc.
So, use what you have available!

My house has a couple of great brick walls that I like to use.
I also have a great, old fence that has the fantastic green stuff growing on it.
Those are my 2 favorite places to use.


Notice in this photo, the lines are not vertical or horizontal.
Sometimes in photography, a slight slant can really add dimension & depth to a photo.
But, if you are just a hair off, it definitely detracts!
It MUST look intentional.

Let's see what you can come up with.
Anyone ready for some homework?
Find yourself a good, neutral background close to home.

Try to keep it outside.
And the best time to shoot is early morning or early evening.
Feel free to join my {SIG} Pattern Group on Facebook & post your photos there,
or email me at signature.creations@hotmail.com and I will help you out.

Most importantly, have fun!

{SIG}nature Creations

Wednesday, September 4, 2013

How to Photograph Your Garment: Noise

Pin It
First, I am by no means a photography expert.
So, please...consider that as you keep reading.
But, I do know how to take pics of garments I have made.

Photos sell products.
We know that in any situation.
It is really what sets the tone when you are looking to purchase.

Let's start off slowly, shall we?
First things first.
Keeping your eye on the garment & eliminating NOISE.

What the heck is noise?
Well, it is all that background junk that gets in the way of a nice photo.
You know, the row of houses or the door or a messy living room.

That is noise.
It detracts from what you are trying to feature!
And you want your customers to LOOK at your garment, not the crap around it.

Here is a perfect example of what I mean by noise.
Although my trio sure does look cute, there are lots of other things to see besides what they are wearing.
What do you see?


The French doors are a big no no.
It doesn't provide a neutral background (I will get in to that on another post).
You can also see through the window panes.

And if you know anything about having triplets, there are always toys EVERYWHERE.
You get to "see" all that through the panes of glass.
Definitely not nice if you want someone to see the cute skirts & shorts.

Look at the sign on the door.
Again, it catches the eye.
Takes the eye AWAY from what you should be looking at.

Worst of all, the photo is inside.
Not that taking photos inside can't be done but you really need to know how to do it right.
I try to avoid inside shots at all times.

Let's study this shot for a minute.

First, I used FLASH.
That is a big no-no.
I don't care if you have to wait to photograph it, don't use flash.

Flash produces horrible shadows.
Looks at the legs?
See the shadows, it makes them look weird.

Next, the baby gate, chair, and mirror are in the background.
There are several different walls as well.
Not a good shot.

And yeah, the pink shirt & swimming shoes, not so much.
Accessorizing is so, so important.
You want your piece to shine, not the extras to take away from it!

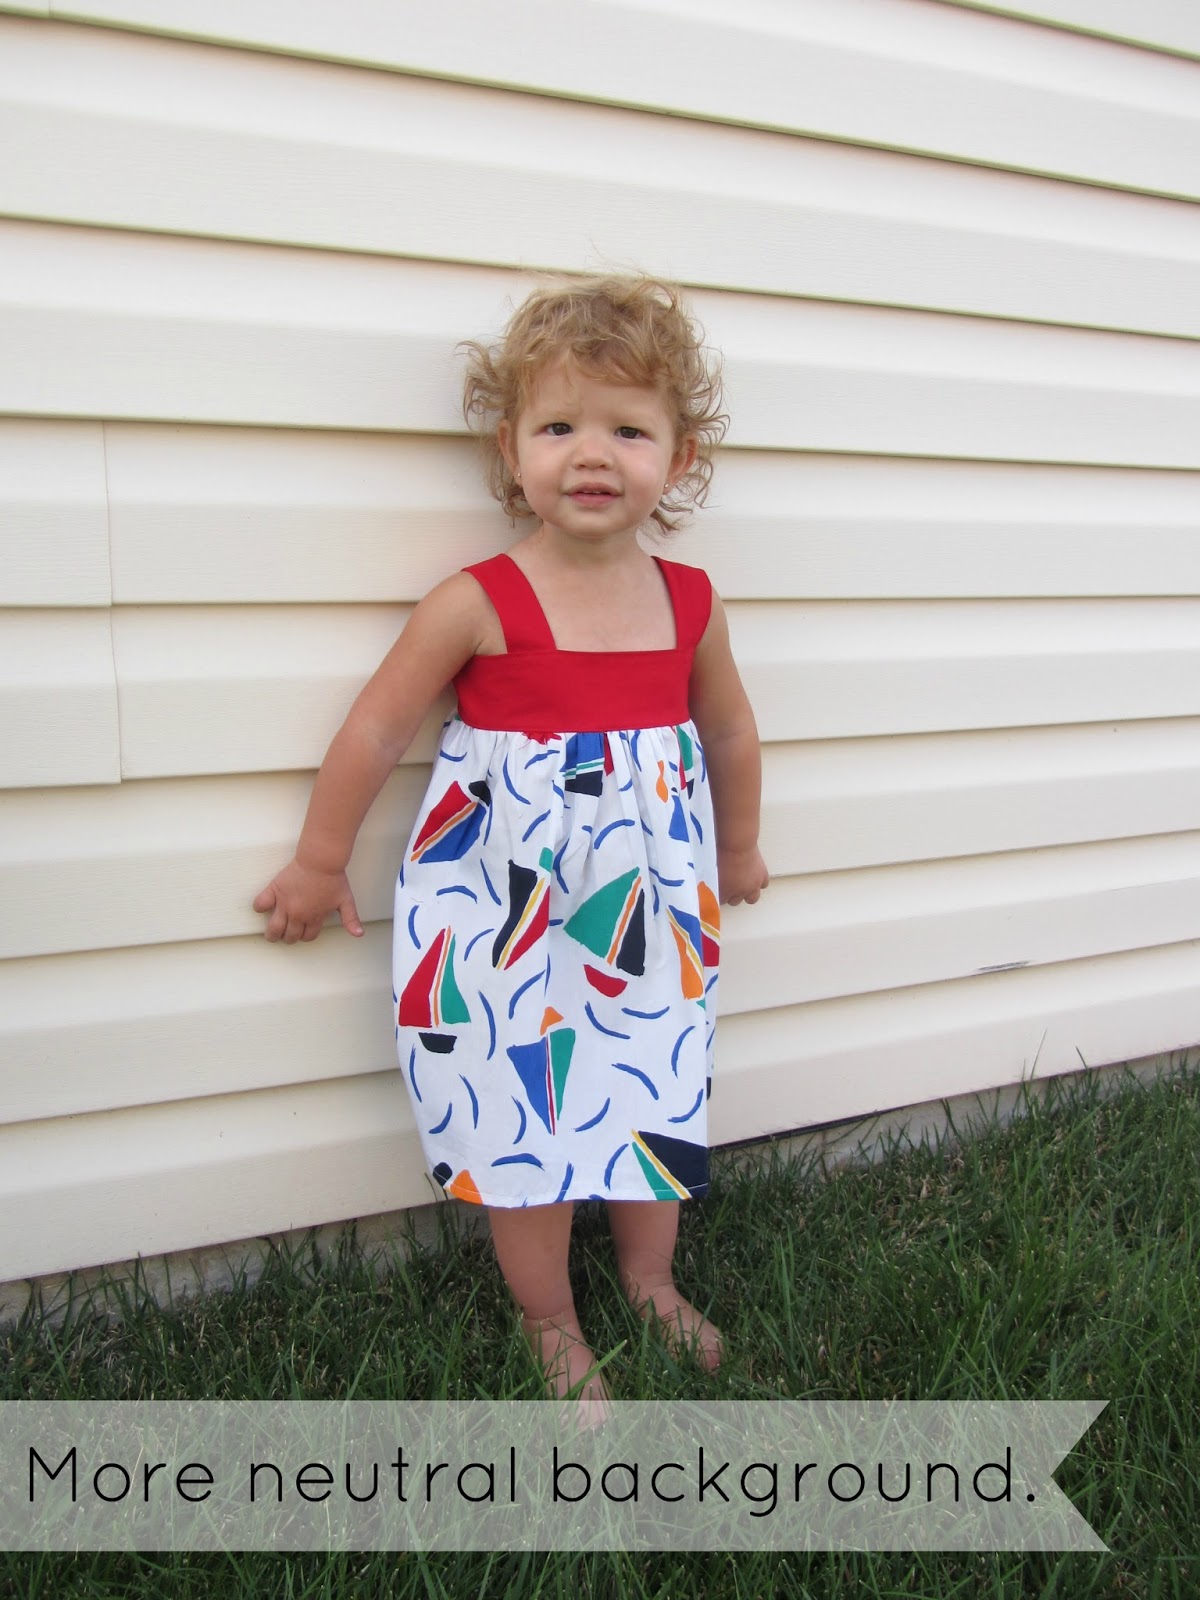
Let's check out some better shots now.


This photo really focuses on the garment.
It is set against a neutral background.
And although it is not a straight shot, there is something said for it being slightly tilted.

Also, the model isn't even looking at the camera.
You don't have to have a smiling model.
I find that shots like this are even better because smiles can feel forced.

The above shot does a great job of showing the whole outfit.
BUT, there are times that you want to feature a part of the garment.
Look below.


I absolutely love this shot of Delaney.
This pattern is the Poppy Maxi Dress.
I wanted to make sure to feature the tie in the back.

You will notice the background is blurred.
Something I have learned to do over time.
Your eye is automatically drawn to the back.

Well, I think I have covered enough for today.
I don't want to overwhelm you.
Try to really look at surroundings next time you photograph!

I promise, this first step will make a huge difference in your photography!

Much love!
{SIG}nature Creations

Sunday, September 1, 2013

Back to Blogging

Pin It
After a much needed break over the summer, I think I am back!
Can't promise you anything as we are adjusting to life with triplets in kindergarten.
Yeah, you read right.

And if you are curious about my precious trio, please feel free to follow along on the Surviving Triplets blog.

Of course, I am going to show you pics of my lovelies in things I made them.
I did a project for the school at the end of last year.
Yes, before my kids started going.

500 shirts upcycled in to reading book bags.
My payback for volunteering?
A few shirts that were way too big to make in to bags.

I got 6 total.
3 were made in to the top/dresses.
3 were made in to shorts/leggings.


I know some will be wondering about the patterns.
For the girls upcycle, it is actually my pattern (yet to be written of course).
Ian's shirt pattern came from Fishsticks Designs and is the Charlie pattern.

Ian's shorts are the {SIG} Regular Shorts/Pants pattern.
The girls leggings are from Lil Blue Boo, the Asymmetrical Leggings pattern. 
And of course, the bows are from Melbows Place.

I dropped them off, the comments started immediately.
The principal absolutely LOVED their outfits.
As did many, many teachers.

I received about 5 messages/texts immediately.
One is a request for photos for the school to use.
Needless to say, I am very happy the outfits were a hit.

And, so there you have it.
The first return blog.
I have some big plans.

Now that the kids are in school, I hope to EXECUTE those plans.
We will see.
After all, life always throws a curve ball.

{SIG}nature Creations

Tuesday, July 9, 2013

Ruffling with Your Sewing Machine

Pin It
Do you ruffle by hand?
Takes forever, huh?
Well, this short video will explain how to get the job done with your sewing machine.

Can't beat that.
Right?
So, get to it!

Leave a comment and let me know what you think!


Have a super fabulous Tuesday, peeps!

{SIG}nature Creations

Sunday, June 30, 2013

To top stitch or not to top stitch, that is the question!

Pin It
Sometimes I get stuck on what to write.
But today, Candice came over to brainstorm some things with me

Man, I can totally remember the days that I skimped on top stitching.
I even have a couple of examples of my work before I knew better.
I think everyone goes through this while they are learning.


Yep, no top stitching.
I feel ashamed.

Dirty.

But that was in the past.
Long, long ago and I have learned better.
Hence, the reason I am writing this post.

First, what is top stitching?
A top stitch is a stitch sewn parallel to a seam or hem.
This helps keep the seams crisp and them hems, well...hemmed!

Top stitching takes your homemade sewing to another level.
Trust me.
It gives your garment a longer life!

Here are some tips to help you top stitch.

1) Press your hem or your seam prior to top stitching.
2) Use a longer stitch length.  Why?  Because your lines will come out straighter!
My favorite top stitch length is 4mm.
3) Press the seams after top stitching to remove any puckering.
4) Top stitch sashes, ties, etc to keep their form.
5) Use a thread color that matches until you are comfortable top stitching.
Then challenge yourself with a contrasting color!


Notice the bodice is top stitched all the way around.
Even where the ruffle meets the bodice.
It really does make for a clean look!


Again, top stitching where the ruffle meets the skirt.
This gives the dress a much more professional look.
It is worth the extra minute or 2 to do!

And that is all, peeps.
This momma is going to bed! 

{SIG}nature Creations

Wednesday, June 19, 2013

Mammograms ARE important!

Pin It
Nope, not sewing related but important none the less.
And I am not ashamed.
I had to do the deed.

The boob smooshing deed.
Yep, a mammogram.
I'm almost at the age where it become annual.

But this is my 5th one.
That means there is history.
One I don't mind sharing if it encourages all women to take preventative measures!

I was 26.
Young & carefree.
Living in beautiful Austin, TX.

And like a good girl, I was doing self breast exams.
To my surprise, I discovered a lump.
After a mammogram and ultrasound, the lump was confirmed.
{did i mention this happened on my BIRTHDAY?  yeah, good times.}

A needle aspiration found it to be benign.
We decided to take no further action.
UNLESS...dum-dum-dum...it grew in size.

Fast foward 18 months.
90 pounds lost.
And the darn lump was indeed bigger.

Which meant another mammo.
Another ultrasound.
Another needle aspiration.

AND, surgery.
A lumpectomy.
The darn lump grew to be 4 times its original size.

NO BUENO.

But, the news came back as benign.
Thank God for little favors.
But it was a wake up call.

Since then, I have had 3 more.
Totally worth it.
Today was just another routine visit.
{crossing fingers for good results}


So I walked up 3 flight of stairs.
Trying to be health conscious.
It's a good thing.


And then I got to put on the gown.
Ain't I sexaaaaaay?!?
I'm thinking the gowns need some serious {SIG} intervention!

So much has changed since my first one.
This time there were only 8 images taken.
It took 15 minutes.

It didn't even hurt to smoosh the boobies.
They will thank me later.
So will my family.

Now, have YOU had one yet?
Check out the guidelines for age and recommendations of frequency HERE.
Most importantly, be proactive.

Do those monthly breast exams.
Fondle those babies.
It is for a good cause.

Get to it!
Happy Wednesday, Peeps!

{SIG}nature Creations

Tuesday, June 18, 2013

Delaney Swimsuit Coverup Tutorial

Pin It
Do you own the Delaney Dress Pattern?
If not, after you see this, you will want to get it!
Isn't this the most adorable swimsuit coverup ever?


My girls absolutely LOVE theirs and it is so easy to make!
They have even fallen asleep in their coverups after a long day of swimming.
And the tutorial to reverse the Delaney and make this cuteness can be found HERE.

BUT, if you aren't on Facebook, it is all good because I'll take you through the process right now.


For more detailed instructions, please join us in the Facebook group!
I promise, your sweet girl will be very happy to have a comfy coverup.

And with the towel costing only $5.88 at Walmart, you can't beat the price.


{SIG}nature Creations

Wednesday, June 12, 2013

Maysen Hi-Lo Dress

Pin It
We all know the hi-lo dress or skirt is very popular right now.
From casual to formal, this dress has lots of style!
Celebrities are wearing them for every occasion.


I am trying to learn how to style watch.
Follow trends.
Design from that point.

And then create a pattern.
For a little girl.
That gives her a little "oomph" but still keeps her covered.

I had a trial run but didn't like the bodice much.


And I received quite a bit of feedback from my gals in
the {SIG} Creations Patterns group on Facebook.
The skirt also needed to have more volume.

But volume can be a challenge if you want to keep it cost effective.
Most longer dresses eat up fabric very easily.
This makes it not affordable for boutique seamstresses to make.

Taking all that in to consideration,
I went to bed that night and my brain would not shut off.
Low and behold, my dreams held my answer.

Eager to get up the next morning, I sketched a couple of alternative bodices.
Finally, I settled on tweaking an existing pattern,
cutting off one sleeve, making it a one-shoulder bodice.


The result makes me smile!
Sofi loved it as well as if you couldn't tell by the photos!
I couldn't stop there.

I have decided this dress will have 4 sleeve options and instructions for a tie
on the opposite shoulder for those that are a bit more conservative.
Of course, I had to sew out another one, with the 3/4 length sleeve.


I have to wait patiently for one of my girls to come home.
I want to see that sleeve draped on an actual arm!
So exciting!!!

Now, comes time to start drafting all the sizes.
Then it will be time to write the pattern.
Oh what fun this is!

But I think you will be pleased when the pattern comes out.
I will even add the sash tutorial in the pattern.
What an amazing little dress.
::swoon::

{SIG}nature Creations
Related Posts Plugin for WordPress, Blogger...