Wednesday, May 30, 2012

Pregnancy Loss Subway Art FREE Printable

Pin It
Many moons ago, when Mr. SIG and I first got married,
we were excited to have children.
Right out of the gate, we were pregnant.
A honeymoon baby.

It was a surprise, in a way.
I mean, how many people get pregnant the first time they try?
We did!

And we were in love w/ our little "onesie".
Boy, were we ever in love.
Life was perfect.

For the next 3 weeks anyway.
Then I started to spot.
We got to see our "onesie" and nothing seemed wrong.
So I was put on bed rest.

But the spotting didn't stop.
And so another ultrasound was ordered.
This time, we heard news we didn't like.

The baby's sac was too small.
It was likely that we would lose "onesie".
As luck would have it, only 8 hours later,
I began to cramp severely.

We rushed to the ER.
We hoped.
We prayed.
We cried.

And we waited.
Waited for another ultrasound.
When it finally happened,
our sweet "onesie" no longer had a heartbeat.

Devastation.
Pure, complete unadulterated sadness.
I had never loved something so deeply.
And he was gone.

I was 8 weeks along.
Not enough time.
Nothing I could do to save my baby.

The coming months were very difficult for us.
We kept trying and trying to get pregnant again.
It didn't happen.

Meds and other medical interventions were tried.
Finally, after 20 months, we chose to do invitro.
And we prayed to be given two babies,
one to fill the place of our beloved "onesie".

Alas, our prayers were answered,
in the form of THREE.
Not in my wildest dreams would I have imagined this.

But I wouldn't have it any other way.
I love my babies really, 4 makes them kids but i don't care, haha
with all my heart and my soul.
I would die for them.
And although I am still sad that we never got to meet "onesie",
one day I know I will see our beautiful child again.

His sacrifice allowed us to have Sofi, Ian, and Gabi.
Our loss was also our gain.
Funny how things work?

And along the way, I met MANY other beautiful women
that have endured loss during pregnancy.
Some, over and over again.
Some actually getting to meet their angel.
Some that are still without a child to this day.

This will always be near and dear to my heart.
I would not wish this on my worst enemy.
{good thing i don't have many...or maybe any}
Loss is heartbreaking.

When I have a chance to do something to honor this,
I jump at the chance.
Whether it is to raise money for a funeral,
make a graphic "siggy" used in forums,
make blinkies,
or in this case...subway art,
I don't hesitate.
{click on image to enlarge to 8x10 printable}

Thank you Augie for the suggestion.
Thank you to all the ladies that shared this on Facebook.
I wish I didn't have to make it.
But I'm glad that I could.

For all you angel mommies out there,
whether you frame this or put it in a scrapbook of your angel,
or any other beautiful thing you want to do with it,
I hope it helps...just a wee little bit.

LOVE YOU ALL!

{SIG}nature Creations

Tuesday, May 29, 2012

Coffee/Drink Cozy Tutorial

Pin It

After a much needed 3 day weekend,
{SIG} is back to working!
Since I made the teacher's coffee/drink cozies,
I thought it would be a great little tutorial.

The best part, it only takes some scrap fabric!
Perfect for teacher gifts or stocking stuffers,
this tutorial shouldn't take longer than about 30 minutes to complete.

Ready to get moving?
Materials:
~ Your choice of fabric, must be about 11" in length
~ Rubber Hair Band (or a pack just in case you want to make more)
~ Button (I chose to cover a button)
~ Fleece, fusible fleece or any other substitute
~ Starbucks sleeve
~ Iron & ironing board
~ Sewing machine & notions


Tear open the Starbucks sleeve and lay flat on paper.
Trace around sleeve, adding about 1/4".
Cut out your pattern.


Fold fabric over so that right sides are facing.
Trace pattern on to fabric.
Trace again on to your fleece.
Cut out.
You should have 2 pieces of fabric and 1 piece of fleece.


Keeping your fabric right sides facing,
please the piece of fleece directly on top.
Also, take your rubber hair band and place between
the 2 pieces of fabric.


Sew all the way around at about a 1/4" seam allowance.
MAKE SURE to leave about a 2" opening at the bottom
so that we can turn it right side out.
Then clip your corners as shown in the photo.


Now that you have sewn around,
turn right side out.
I like to use the blunt end of a skewer stick to get
my corners nice and pretty.
Press with a hot iron.


Sew all the way around, closing your opening.
Use a 1/8" seam allowance.


Sew your button on about 1.5" from the side.
And that is all folks!
You are finished and ready to use your cozy.


Told you it was easy!
Enjoy and feel free to share your finished cozy on our Facebook page!
{SIG}nature Creations

Saturday, May 26, 2012

Moms of Multiples Subway Art FREE Printable

Pin It
I know, 2 posts in one day!
Shut the front door!!!!

For all my moms of multiples, I had to make this one.
This version is FREE but I can customize it for ya for only $8.
{click on image to enlarge and print to 8x10}

Now, I am going to rack my brain for some other ideas for subway art.
I promise I'll sew again someday soon!
But this is FUN!

{SIG}nature Creations

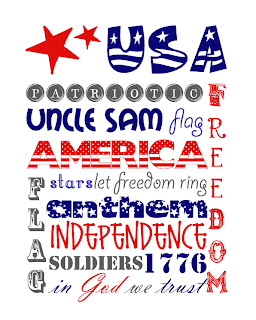
Patriotic Subway Art FREE Printable

Pin It
When I start the creative juices flowing, they don't want to stop.
I'm hooked on the subway art!
In honor of all the fallen soldiers that have fought for our country,
I decided to tackle a patriotic version.

Being from a different country (Argentina),
I sometimes think that I enjoy these particular holidays.
I know that this country is a great, FREE country.

I always honor the soldiers that have fought and are fighting
for us to enjoy the freedom they provide us.
I also like to give the families of soldiers something special.

Hopefully these families will enjoy this printable.
Totally free and ready to be printed.
{click on the image to enlarge and print to 8x10}

Thank you to all the soldiers, the families that support the soldiers,
the children that have absent parents and the sacrifice of 
everyone involved in our country being as great as it is.

Enjoy the Memorial Day weekend!
I know we will as Mr. SIG is smoking some ribs right now.
YUM!

{SIG}nature Creations

Friday, May 25, 2012

Father's Day Subway Art FREE Printable

Pin It
Yep, I'm hooked.
I spent much of the morning downloading new fonts.
Glad I did.

Staci suggested I do subway art for Father's Day.
So I took the challenge.
With my new fonts on hand, I was ready to go!

Now, I am no expert but I learn pretty quickly.
I think I am getting the hang of this.
What do you think?

{click on image to make larger, should print to 8x10}

I love the colors.
The kids' daddy, Mr. SIG, will be very happy.
His favorite color is blue.

Now, if you like this, you better PIN IT!
Or share my blog with your friends.
The more followers we get, the more motivated I become!

Help me grow!
{as it is, FB has really slowed down traffic & business}
Spread the {SIG} love and have a happy Friday peeps!

{SIG}nature Creations

Wednesday, May 23, 2012

Teacher Subway Art Free Printable ~ Last Day of School

Pin It
I searched and searched and searched the internet
for a super cute printable for the teachers.
Alas, there was only 1 out there and I really didn't like it.

So, I decided to try to make my own.
Subway art that is.
About teachers.

This is my first attempt and I think I like it.
Super easy to make in Photoshop.
I'll be making more fo sho!


{click to enlarge to 8 x 10}

{click to enlarge to 8 x 10}


I also wanted to frame the subway art.
In pretty colors of course.
And for cheap!

So I took a trip to Family Dollar.
I found some $1 frames.
Bought them.
Spray painted them in some of my favorite colors.
And framed the subway art.

Perfect teacher gift!
But you know that wasn't it.
I had to put more goodies in their market totes.
{purchased those from Lily Lou and had them personalized}


I also made the teachers these drink cozies.
Aren't they adorable?
Gotta love chevron!
{yes, a tutorial will follow next week}


Oh, that isn't it.
I made plenty of these card holders.
Each teacher also received one with a Starbuck's gift card.
You know us teachers need coffee!

And the best part is that they can put other cards in here.
Credit cards, driver's license, or other gift cards!


Other moms from the class also pitched in to fill the baskets.
This is what they looked like after all was put in there.


The kids were so excited, they couldn't stand it!
All they wanted to do was run in and give their teachers the totes.


Here are my 3 loves with Ms. Christie and Ms. Natalie.
{must get photos of Ms. Melinda and Ms. Margaret}


And we all LOVE Ms. Cindy!
She is so great with the kids.
Can't wait to have these ladies back in our lives in August!

Enjoy the printable and your Wednesday! 

{SIG}nature Creations

Monday, May 21, 2012

Fabric Business Card Holder Tutorial

Pin It

My son goes to speech therapy twice a week.
We have become very close with his therapist.
Jennifer is also the owner of the facility.

So, when her business got a makeover including
new business cards, logo, and website,
she came to me to make the employees
super cute business card holders.

I was so excited!
I love a little challenge.
And honestly, these are so easy to make.

You could also use it for your driver's license or credit cards.
Great and easy gift for just about anyone,
especially us business owners!

Let's get moving!

Materials:
~ 2-3 fabric choices (fat quarter should do)
~ Fusible fleece or plain fleece
~ Sewing machine & notions


You will cut top piece 4.75" wide by 5.5" long.
Also cut your inside lining to 4.5" x 5.5".
Cut 2 pieces 4.75" wide by 2.5" long7 (pockets).
Don't forget the fleece, also 4.75" x 5.5".


Take your pockets and fold over 1/4" and press.


Fold again at 1/4" and press.


Top stitch across your nicely folded hem.


Place your inside lining fabric with the pretty side up.
Put the pockets directly on, again, pretty side up.


Lay your outside fabric pretty side down.
Then place your fleece over that.
{you should have 4 layers at this point and you can
pin the layers in place if you choose}


Go to your machine and stitch around,
leaving about a 1" opening so we can turn it 
inside out when we are ready.


This is what it should look like at this point.
My fleece is on the underside in the photo.


Cut your corners.


Turn it outside in.
This is where your really see it coming together.
Use your favorite tool to help get those corners perfect.
Then top stitch about 1/8" all the way around.
This will also close your opening.
Press on high to give your business card holder
a nice, crisp look!


And here you have it!


Super easy, you can even use them for gift cards!
I used scrap fabric I had around and had a blast
coordinating fabrics that didn't come from the
same collection, making for fun holders.

Share your finished product on our Facebook Page!
Have fun!

PS ~ Edited the width of the project so that more cards
could be held inside rather than just 1 in each pocket!

{SIG}nature Creations

Friday, May 18, 2012

Skye Reve + {SIG} WINNER

Pin It
I love being able to give this package deal away.
A pattern of your choice from {SIG} and
any beautiful fabric from Skye Reve.

I know you guys are dying to find out.
So here is our lucky number...


And who would be lucky # 19?


Congrats Carla!
Please contact me at signature.creations (at) hotmail.com
to claim your prizes and if you would,
please share what you end up making!

Happy Friday Peeps!
{still feeling sick & trying to keep up with everything but truckin' along}

{SIG}nature Creations

Wednesday, May 16, 2012

Gauze Swaddle Blanket Tutorial

Pin It

I love babies.
I don't want any more but I love when my friends have them.
And I am especially happy when close friends have one.

Staci welcomed in to the world, a beautiful baby girl.
Carly is so sweet and I was fortunate to have snuggle time
with this precious child, even fed her a bottle.
oh how i miss itty bitty babies...no more...convincing myself

Some back history...my triplets loved to be swaddled.
While on bed rest, I researched swaddle blankets.
And I researched some more.
Until I found Aden + Anais.

That was it.
I fell in love.
And boy, did those blankets work!
My kids stayed swaddled until they were 7 months old.

As I got in to sewing, I knew I could make my own.
Just didn't have the time.
I mean, who does with triplets?

But I wanted to hand dye them.
I haven't done any dyeing since I was a kid.
I found a great tutorial on MADE and went for it.
Dana also wrote up a good tutorial on how to made swaddling blankets.
{i loved the hearts so i followed suit & put them on carly's blankie}

Materials:
~ Gauze (aka - muslin in other countries)
Fabric.com has a great selection HERE.
~ Dye
~ Bucket (I picked mine up at the 99 Cent store)
~ Sewing machine & notions


Remember, I followed Dana's tutorial on how to dye
and this was my first time so it went ok, definitely far from perfect!
Before you get started with dyeing,
cut your gauze out so that the length of the gauze is
the same as the width of the gauze from selvage to selvage.
Mine measured out to be about 48" squared.


Fill your bucket with super hot, hot water.
That means as hot as you can get it out of the tap.
The amount of dye you pour in will determine how
saturated your color is.
I think I did 3 quarts and half a bottle of the dye.


Place gauze in to your bucket.


I used tongs to help get the gauze deep in to the dye water.
I mixed it around every 30 minutes and did so for about 4 hours.
{hubs is going to love me for using his tongs...oops}


I pulled out the gauze after all that time and rinsed it.
This took some time because you have to really try to rinse it
until the water is no longer coming out tinted.


Next step was to wash it.
I did a short cycle.


Once it was dried, I took it to the ironing board.
I pressed each side 1/2" and folded again another 1/2".
{i did only one side at a time}
I didn't do anything fancy for the corners either.


Time to top stitch!


Because I loved the hearts so much,
I had to add them.
Dana is brilliant when it comes to cool ideas!


I free handed a bunch of hearts from white gauze
and some fuchsia gauze (the other color I tried out).
I made them all different sizes.


After pinning each one in to place and pinned it,
I went to my sewing machine to stitch them in to place.


And here you have it!
Now, I told you the dyeing was far from perfect.
But I think I like it like that.
Makes it look worn and comfy.
{will try harder next time but for now it works}

Staci couldn't have been happier getting these
huge swaddling blankets because babies really can't break free.
The gauze is stretchy enough to make a nice, tight swaddle but
still breathable so that baby doesn't get hot.
That is important here in Houston.


Isn't she precious?
Carly...oh sweet Carly.
baby fever leave me alone
Enjoy your time swaddled my sweet one!

And please, don't forget to check out our awesome giveaway.

{SIG}nature Creations
Related Posts Plugin for WordPress, Blogger...