Monday, January 30, 2012

Bee Jaded Jewelry GIVEAWAY

Pin It
You aren't going to want to miss out on this one.
Jessica has teamed up with us several times,
including our big {SIG} photo shoot,
and makes fantastic items.

The gorgeous pendant & necklace below are a new addition
to the Bee Jaded collection, called the Brynleigh.


One lucky reader is going to win this.
I wish I could!

Here are the deets for the giveaway on this Happy Monday.
Please remember to leave SEPARATE COMMENTS for each of the below.
You have until Thursday, Feb. 2nd at midnight to enter.

1) Become a follower of the {SIG} Blog & leave a comment to let me know.
2) Subscribe to the {SIG} Email Club & comment to let me know.
3) Become a fan of the Bee Jaded Jewelry Facebook fan page,
leave her some {SIG} love & comment here.


BONUS ENTRY:
Get one other person to follow the blog!
Comment with their name so I can check.


That's it!
Perfect for Valentine's Day or every day wearing.

A $60 value, so totally worth getting all the entries!


Get on with it!
Start commenting!


Throwing out the love to all the new readers!!!
PEACE!

{SIG}nature Creations

Saturday, January 28, 2012

Sky Reve & {SIG} Giveaway WINNER

Pin It
First, I want to tell you some FABULOUS NEWS!
I approached Natasha about doing a monthly giveaway.

Exciting, I know!

And she agreed!
We will pair up once a month for a
$20 credit to Sky Reve and a {SIG} pattern of your choice!

It doesn't get much better than that.
Does it?

I know you are dying to find out who won the combo package.
Here is the lucky number!
{might i add that this is the most ever}


Congrats to number 138!
I counted 3 times so hopefully I got it right, haha!


Madam, please contact me at signature.creations@hotmail.com
to claim your wonderful prize!

And, if you are dying to see what is up next week for snags,
check out this beautiful pendant by Bee Jaded Jewelry.


It is perfect and will be done just in time for Valentine's Day!
I love it.

Stay tuned on Monday for the deets!
Have a wonderful weekend.
{god help me, i am taking the kids to chuck e cheese alone for a party}

{SIG}nature Creations

Friday, January 27, 2012

{SIG} Workroom Redo

Pin It
It's been a long time coming.
I have been wanting the Expidit furniture from IKEA
since I saw them in Staci's workroom. 

Drooling.
Dreaming.
Thinking.
Reorganizing in my head.
Waiting.
Agonizing.


Until I had enough.
I looked at my messy, unorganized workroom and
was going to organize it on Thursday.

Then I thought, "What in the world is the point?"
It is still gonna look a mess.
I'm still not going to be happy.

Just look at it.


A hodge podge of furniture that has been given to me.
No nice storage boxes.
A plastic Rubbermaid cabinet.
An old piece of countertop on 2 sawhorses.
{yes, I'm for real...GHETTO}
Only what I could find here in the house and repurpose.

Enough was enough.
{SIG} finally afforded me the opportunity to buy something for the business.
So I loaded up my triplets yes, crazy & daring and headed to IKEA.

Only to get there and them not have ANY of the 4x4 cube units.
On the fly, I had to think of what to do.
With 3 kids in tow, it made for an interesting outing.

Actually, they did very well.
I can't really complain.
And I was able to come up with an alternative.

I went with a 5x5, attaching a desk.
I also added a 2x2 for sewing students to have their own area.
There is one on the end of each desk.
Eventually, I plan on hanging a drape so you can't see underneath.


The desk on this unit is my actual computer/office desk.
I didn't have one before.
It is much easier to blog & keep my schedule up to date this way.
And I love the quote.
"The expert in anything was once a beginner"


A better view of several of my cubbies.
It is great to be organized!
So inspiring. 


I also bought storage containers.
The big ones were 2 for $9.99.
Can't beat that!
The nice thing is that they fit quite a bit in there.
Makes me a happy camper!

Then I went with a 4x2 with an attached desk.
At the end of the desk is another 2x2.
Originally, I had planned on this being my sewing table.
But I realized if I made this the sewing table, I would be short a space.

It instead became the packing/cutting table.
And I have LOVED cutting my fabric on here.
Plenty of room.
And I even framed the free printable I made & put it in a $2.99 frame from IKEA.
The other framed quote says "The harder you work, the luckier you get."
The piece below was given to me by my dear friend Adrienne.
Again, a drape will eventually be made to block the view underneath.


Don't think I forgot about the sewing machines!
They have their own separate wall now.
I love it.


I added the lamp (purchased from IKEA a few years ago) for extra lighting.
I also purchased the wrought iron dress form from Hobby Lobby on sale for $55.
The perfect place to put the scarves I made!

That is also a $30 clothing rack from Target.
I put anything I am working on or finished there.
It is super handy.
I've also contemplated making a cover for it.
Hmmmmm...


For the cork board, I went to Target.
They had a 4 pack of cork squares for $6.
I only used 2 for behind the sewing machines.
This is where I keep all my orders.

And that's it folks.
The big redo is pretty much finished!
I may add some things here or there.
But that's it.

I will try to feature some of my organizational tips in other posts.
For those of you that are curious, of course.
And PLEASE, feel free to ask any questions!

Just leave a comment and I will devote a blog post to answering them.

Happy Friday my peeps!
PEACE OUT!

{SIG}nature Creations

Wednesday, January 25, 2012

Clothing Label Tutorial

Pin It
Once you read this, you are going to be surprised
at how easy it is to make your own labels.
You don't have to be sewing for anyone but family and friends to be "official".

And let me tell you, I went through quite a few other options before I discovered this.
First, you are going to need inkjet transfer paper.
{I buy mine from Dharma Trading Co. & have both opaque & super soft.}

Next, you need to have Word or Open Office.
Come up with what you would like the label to say.
In my case, I want the company name, the type of fabric used, & sizing.


I made mine through creating a full page label.
Notice that each column has it's own size?
You can also change it so that it is a full page of just one size.

Then you print it out.
Use the best printing option, don't skimp.
This is important because the washing will take it's toll on the label.


I use my handy dandy paper cutter that I kept after I stopped teaching.
Line that puppy up and cut away!


For those of you curious as to how I store my labels, here ya go!
I repurposed this old container by labeling each section for each size.
I even have a generic label for burp cloths and what not.

  
There ya have it peeps...my way of making clothing labels.
Now, as soon as I figure out how to make
the clear super soft labels on Word 2010,
I promise to write a separate tutorial for it.

Don't forget to enter in our giveaway by Sky Reve & {SIG}.
It ends tomorrow night at midnight!

Chuckin' da duces & hoping we don't get too hammered today by bad weather!

{SIG}nature Creations

Monday, January 23, 2012

Sky Reve Fabrics + {SIG} Giveaway

Pin It
If you know me well, you know my main fabric supplier is Natasha.
She owns Sky Reve Fabrics and I love her to pieces!


Let me tell you the story.
It all started just over a year ago.
She had a referral contest to win a bunch of fat quarters.

I won.
Then I started purchasing fabric from her.
Finally, I approached her to be my fabric buddy.

The rest is history.
And quite the friendship has blossomed from working together.
I only hope that the next time she is in Houston for
the annual Quilting Market that I get to meet her.

We like to pair up for giveaways.
She gives the fabric, I give the pattern.
A match made in Heaven if you ask me!

Miss Natasha is going to give the winner a $20 credit to her store.
And have you seen the pretty fabric she has gotten in?


These are just a few bundles she carries.
I love the Delovely bundle, perfect for Spring!
It would make for a good pair of Lillie Bell Mega Ruffle pants.


Or an Ava Mega Twirly Skirt.


The winner will also get to choose any one pattern from {SIG}.
Can't get better than that!

So here are the deets my peeps!

The giveaway will end Thursday, Jan. 26th at midnight CST.
Make sure to leave SEPARATE comments for each of the following...

1) Become a follower of the {SIG} Blog & leave a comment to let me know.
2) Subscribe to the {SIG} Email Club & comment to let me know.
3) Become a fan of the Sky Reve Fabrics Facebook page,
leave her some {SIG} love & comment here.


BONUS ENTRY:
Get one other person to follow the blog!
Comment with their name so I can check.


That's four entry possibilities!
For those of you sewing, wanting to learn to sew or have someone that sews for ya,
this is the perfect giveaway.


Now go on & start commenting.
Enjoy and hopefully this will bring a smile to your Monday.

{SIG}nature Creations

Sunday, January 22, 2012

Happy Sunday Peeps!

Pin It

I've got this quote hanging in my newly designed workshop.
I love it.
Reminds me that a beginner isn't too far away from being an expert.

Happy Sunday!

{SIG}nature Creations

Thursday, January 19, 2012

Valentine's Scrappy Heart Wreath Tutorial

Pin It


I said I was going to make it over the weekend.
Then I realized that meant I would have to take more stuff with me.
So I "scrapped" that idea and decided it would be best to do it at home.

And I was able to watch The Bachelor while I did it.
Don't you dare make fun of me and my Bachelor addiction.
Once I did the first one, the second only took about 40 minutes.

So here we go!
This is easy peasy.

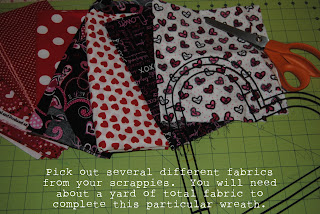
Materials:
 ~About 1 yard of scrappies ~
{I mixed cotton prints & denim together}
~ Heart shaped wire wreath ~
{I purchased the heart shaped wreath from Hobby Lobby for $2.49}
~ Pinking Shears ~
{optional}
~ Rotary Cutter & Mat ~
{optional}

Each photo has the instructions for the steps.
Click on the pic and it will get bigger.
But, just in case, I'll write out the steps just the same.


You will cut your fabric in to 1.25" x 7" strips.
I used my rotary cutter for some of this BUT,
I also used my pinking shears to add a bit of "flava".


Time to tie the strips of fabric on!
I only tied it once, no knot.
And I didn't go in any specific order.
I just randomly picked a strip.


Notice the heart is split in to sections.
I did one section at a time.
It was easier that way.


About 45 minutes later, this is what I got!
You will have to fluff it a bit.
But isn't it adorable!?!
And so easy to do, just like I said.


These 2 wreaths are for my kids' teachers.
I figure they would appreciate something like this more
than the mug full of special chocolate treats.
As a former teacher, I speak from experience!

Now, I would LOVE to see what type of wreaths you come up with.
And it doesn't have to be a heart shape, or for Valentine's.
As a matter of fact, I want to make one for St. Patrick's Day.
And the 4th of July.
Shoot, go ahead and add Halloween, Thanksgiving, and Christmas to the list.

An easy way to decorate!
Go on, have fun!

{SIG}nature Creations

Wednesday, January 18, 2012

Elastic Waist Measurement Chart

Pin It
A {SIG} fan and fellow sewer contacted me this
past weekend with a really good question.
She even offered to PAY me for the answer.

Um, that is rediculous!
Not only did I answer her question which
was what our measurements for elastic waist per size,
I decided to make this cute printable for anyone
else out there wondering the same thing.
{just click to make it bigger, should print out to 8.5" x 11"}

After a Google search, she was right.
No one has published publicly the elastic measurements
they use for their patterns.

This is what we use on all our patterns & clothing.
Never had a complaint on sizing so you shouldn't either!

Enjoy & Happy Printing!

{SIG}nature Creations

Monday, January 16, 2012

Photography ~ Sunsets

Pin It
You've seen 1000 sunset photos.
The pretty kind that everything in front of the sunset is blacked out.
The beautiful warm orange tinged sky.

Ah...makes you want to run away...and never come back.

Have you ever wanted to replicate the shot?
I know I have.
A million times over.

But alas, in the Houston 'burbs, it is hard to get a pretty sky.
Much less a clear view of the pretty sky.

This weekend I was afforded the opportunity to capture a sunset.
A brilliant sunset.
Gorgeous.
Makes me want to run all the way back up to Clifton.
And steal some more shots.

I am by far not an expert.
I'm not even sure I can explain in proper terminology what I did.
But I will try my best.

I started with this shot.
I found a tree and put the sun behind it.
Wasn't sure how it was going to turn out but the objective
was to make the tree dark (no color) and let the sky be the color.


From there, I went on to put the sun on the side of an object.
I was on a caliche rock road that had some hills, hence the straight line at the bottom of the photo.
The side is some brush.
I liked the angle.


Boy, do I like this shot.
It was taken only a few shots after the one above.
The sun was really starting to set.
I let more of the sun come through this photo.
No special ISO or aperture setting.
{on any of these actually, just no flash}


Yes, this hurt my eyes but well worth it!
No fabulous setting here.
I shoot in auto quite a bit.
I just made sure that I didn't have the flash on.

I love the 2 orbs I caught.
I was actually trying for them.


Again, I positioned the sun to one side corner.
No flash and on auto.
It isn't hard to capture.


This was the first signs of clouds throughout the whole day.
The sunset caught them and I had to take a photo.


Finally, a barren tree.
The sun had dipped just below the horizon.
I put the tree in my frame using the rule of thirds.
No flash, on auto.


You don't have to be a pro to get some good shots.
Just the right opportunity.
And although I have a Nikon D3000,
now old & decrepit compared to the D7000 I am drooling over
I am fairly certain you could get photos like this with a point and shoot.

Curious about my lens?
I have a Nikor 55-200mm VR lens on for this shoot.
It is what I use 90% of the time.
But I need a new 18-55 mm VR...coming soon!

I just wanted to share a bit of my "hobby".
It is a true love of mine.
Something I don't get to do often enough.

Hope you all are enjoying MLK Day!

"Faith is taking the first step even when you don't see the whole staircase."

Martin Luther King, Jr.

{SIG}nature Creations
Related Posts Plugin for WordPress, Blogger...