Showing posts with label scrappies. Show all posts

Monday, June 25, 2012

DIY Fabric Covered Headband with Bow/Flower Attachment

Pin It

Here is another great tutorial for scrap fabric.
It really doesn't take much at all.
And with the added piece of ribbon,
you can attach a floral clip or bow very easily.

My Sofi hasn't taken it off since I made it for her!

Materials:
~ Headband (1/2"-1" wide) - You can find them in your local craft store.
OR...if you know you are going to make more than one,
be cost effective and purchase from HERE or HERE.
~ Fabric scrap at least 16" in length and 2" wide
~ 3/8" grosgrain ribbon
~ Hot glue gun


You will cut your scrap fabric to be about 1/4" longer
than your headband which makes to about 16".
Make sure that it is long enough though before you cut!
And I like to use pinking shears.


 Place glue on the inside of the headband
and lay fabric on there with it hanging over
the edge about 1/4".
We are only going to do about 2-3" sections at a time
until you get to the other end.


Don't worry if you fabric isn't flush.
We will pull it taut when we glue the other side down.


Fold up the end of the fabric piece and glue down.
Then fold over the fabric so that it looks like the photo.
Continue to place glue on the under side of 
the headband and fold over the fabric.
This is where you will pull it taut
which will take out the wrinkle!


The underside will look a little messy.
That is what the ribbon is for.
I like to take a piece of grosgrain ribbon
since it is a sturdy ribbon and using a lighter,
I burn the edge to seal it.
Put a dab of hot glue at the end
and place your grosgrain ribbon on.
Continue to put glue down the center
and your grosgrain on top of the glue.
This will hide your "seam".


Now, we are going to place a piece of ribbon
on the side of the headband as it begins to
curve because this is where you will be
able to slip in an alligator clip bow or flower.
Place glue on the underside ONLY.


This is what it should look like with both pieces folded under.


And here is your "loop" on top.
Still looks cute but even cuter when you attach something to it!


I used one of our {SIG} blooms to attach.
And it turned out so cute!
My Sofi loves it to pieces!


She wants to keep it.
I want to give it away.
Both pieces...the headband and the bloom.
I guess we will see who wins later.

And don't forget, we LOVE to see what you make!
Come post a photo on our Facebook Fan Page.
I think this would be great in patriotic fabric
along with a pair of scrappy flip flops, don't you?
{check out our tutorial for the flip flips HERE}

Happy Monday Peeps!

{SIG}nature Creations

Sunday, June 24, 2012

Scrappy Flip Flops ~ WINNER

Pin It
Waahoo!
Well...maybe not so much.
We have a tropical storm brewing in the Gulf.
Miss Debby hasn't decided exactly where she is going.

This has all of the Gulf Coast sitting on the edge of their seat.
Honestly, we wouldn't mind a TS.
Houston needs the rain.
Badly.

So, while we wait to see where Debby goes
and whether she will turn in to a hurricane,
I will continue to sew and work on tutorials.

But for today, I want to share the winner!


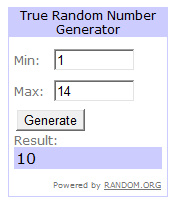
We had 14 comments!
And random.org chose #10!

Miss Lisa, please contact me at...
signature (dot) creations (at) hotmail (dot) com
to claim your cute flip flops!

Thank you all again!
And be on the lookout for the next amazing giveaway,
a combo deal from Skye Reve Fabrics and {SIG}.

{SIG}nature Creations

Thursday, June 21, 2012

Scrappy Flip Flop GIVEAWAY

Pin It
Seems like I have goodies to give away after every tutorial.
Not a bad thing.
Cuz I can't keep it all.

Mr. SIG wouldn't be happy.
I already have cluttered up the "dining room".
eh hem...took it over and it is now my office
So I gotta keep moving this stuff out!

If you didn't catch the tutorial on how
to make your own scrappy flip flops,
make sure to check it out HERE.

And if you aren't a DIY'er,
then here is your chance to win these pretties!


Love the color combo on these.
Glad that Skye Reve sent us this fabric and sponsored our tutorial!
Here are the deets to these size MEDIUM
(they fit up to a 8-9 cuz I'm about an 8.5).

You will have through Saturday, June 23rd at midnight, to enter.
Please leave only 1 comment for the following...

1)  LIKE {SIG} on Facebook and leave us some love on the wall.
2) Make sure you are following the BLOG.  The more traffic
we get, the more goodies we can give away!
3) Subscribe to our newsletter (which reminds me...gotta write one).

You have to complete all 3 for your one entry!
And for a bonus entry...yep, an extra one...

** Leave some {SIG} love on Skye Reve Fabric's Facebook page,
leave a comment saying that you did!!!**

That is 2 entries.
Simple.
And you win some great scrappy flip flops.
For the beach.
Around the house.
To go to the pool.

What ever floats your boat!
Chuckin' duces peeps!!!

{SIG}nature Creations

Wednesday, June 20, 2012

DIY Scrappy Flip Flops

Pin It

Scraps of fabric drive me nuts.
They really do.
There just isn't much you can do,
or maybe there.

Today's tutorial is similar to the Scrappy Heart Wreath
tutorial I posted back in January.
You are just going to use a different "base".

It doesn't take long to make a pair.
I made 3 in a matter of about an hour.
This is great for gift giving or for yourself.
You could even do this as a craft at
a birthday party or with your kids.

There isn't a whole lot you will need.
And it won't cost you much,
especially if you use a coupon to Hobby Lobby.
{i get mine on the phone and show it to the cashier
but you can also print it out HERE}

The flip flops cost me all of $0.98.
The scraps I used...FREE.
Can't beat a cute pair of flip flops
for less than a dollar and sure to be one of a kind!

Materials:
~ 1 pair of flip flops (I recommend Hobby Lobby
but you can always go to Old Navy or Target)
~ About 1/3 yd of fabric (if you are doing 1 fabric choice)
~ Scissors or pinking shears
~ Your hands :)


Cut your fabric in to 1" strips.
You can either cut it with straight scissors or pinking shears.
I used the pinking shears to give it dimension.
Then cut the 1" strip in to about 7"-8" pieces.
To give you an idea of how many I used for the girls'
flip flops, I tied about 20 pieces on each shoe, 40 total.


Starting in the center, tie your first strip of fabric on.
Make sure you pull tight!


Tie in to a knot.
Again, make sure it is tight.
This should be good enough to keep
the fabric on there for good!


Continue to add pieces on.
Make sure they are close together.
You can alternate fabrics or use the same one
over and over again, depends on you!


Sofi picked out her fabric and these are her finished flip flops.

  
Now that is a HAPPY girl!
She hasn't taken them off yet.
{don't mind the band aide on her forehead}


And I couldn't stop at one pair.
I had to make some for Miss Gabi too.
She picked out the green flip flops
and wanted pink fabric but I had to throw
in another choice just to make it go better.
Eh, she loves them just the same.


The pair below...those are going to be given away tomorrow.
Size medium!
I love the light blue and the green together.
LOVE.
Want to keep them for myself but I want to share the love.


There are a million things you can put in the center
of these flip flops like a fabric bloom or bow.
Maybe I'll have to show you some embellishments
later this week or next week.

A big THANK YOU to Skye Reve Fabrics 
for sponsoring the tutorial today.
All the lovely fabrics shown were provided by Natasha.


She is a great gal and great to work with.
If you are looking for fabric, check her out!

And please, stop by our Facebook Fan Page.
Show us what you made from this tutorial!

Don't forget, come back tomorrow to win a pair!
Happy Wednesday Peeps!

{SIG}nature Creations
Related Posts Plugin for WordPress, Blogger...